

728x90
728x90
Azure 스토리지 계정(Storage Account) Blob Service/File Service/Queue Service 연동 및 실습
들어가며
- Microsoft Azure의 Blob Service, File Service, Queue Service를 Local Storage와 연동한 후, Local Storage에서 실습을 진행해보자.
- 이 과정을 통해 원격으로 Local Storage에서 Azure(클라우드)에 있는 Storage Account를 관리할 수 있다.
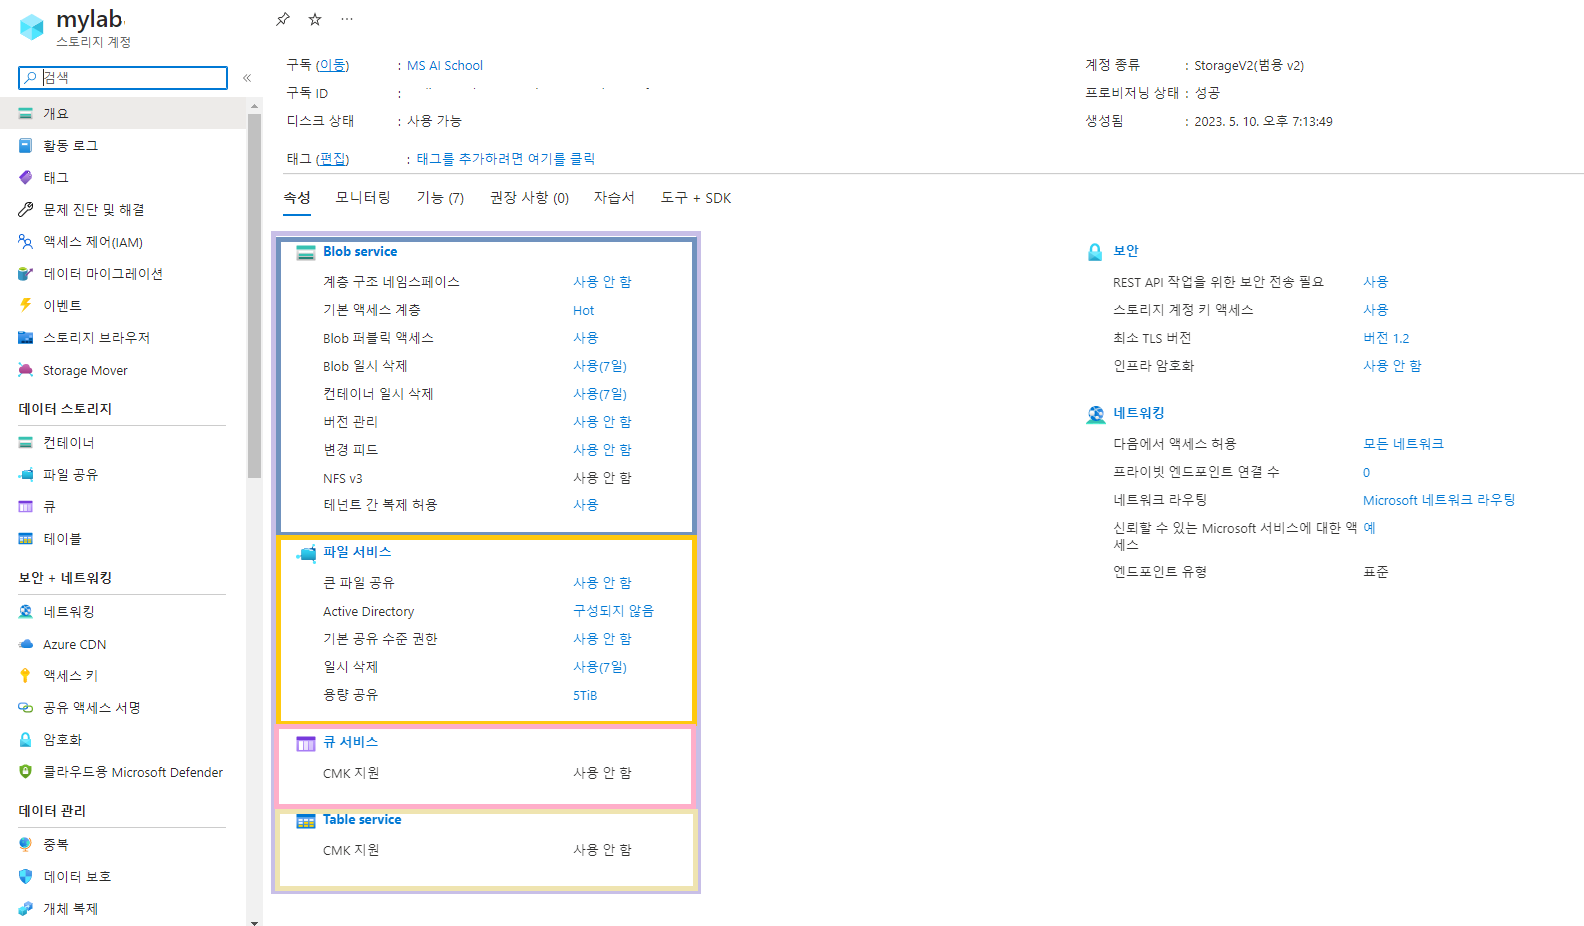
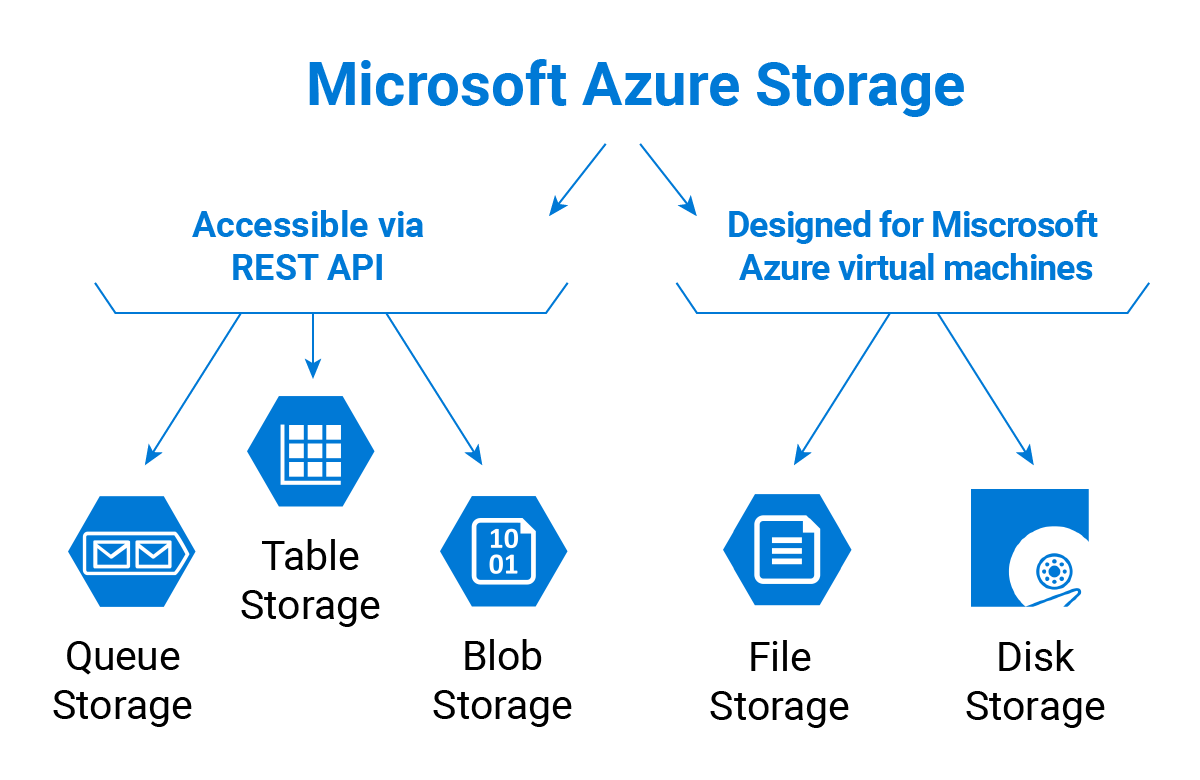
Azure Storage Account 서비스
 |
 |
① Azure Containers(Blobs)
- HTTP 또는 HTTPS를 통해 어디서나 액세스 가능하다.
- 텍스트 또는 이진 파일과 같은 대량의 비구조적 데이터를 저장할 수 있다.
- 액세스 : @http://mystorageaccount.blob.core.windows.net@
② Azure Files
- SMB 3.0을 통해 어디서나 액세스 가능하다.
- 항상 사용 가능한 네트워크 파일 공유 호스트이다.
- 액세스 : @http://mystorageaccount.file.core.windows.net@
③ Azure Queues
- HTTP 또는 HTTPS를 통해 어디서나 액세스 가능하다.
- 비동기 통신용 큐 기반 매커니즘을 제공한다.
- 큐에 최대 64KB 크기의 메시지를 저장할 수 있다.
- 액세스 : @http://mystorageaccount.queue.core.windows.net@
④ Azure Tables
- HTTP 또는 HTTPS를 통해 어디서나 액세스가 가능하다.
- NoSQL 테이블을 저장할 수 있다.
- 액세스 : @http://mystorageaccount.table.core.windows.net@
실습하기
- 잘 사용하지 않는 Table 서비스는 실습하지 않았다.
① Blob Service 다루기
- 필요한 패키지를 설치한다.
# 필요한 패키지 설치
!pip install azure-storage-blob azure-identity
import os, uuid
from azure.identity import DefaultAzureCredential
from azure.storage.blob import BlobServiceClient, BlobClient, ContainerClient- Azure에서 연결 문자열을 가져와 연결 문자열을 이용하여 Azure Blob 서버에 접속한다.
# Azure에서 복사한 '연결 문자열'을 이용하여 Blob 서버에 접속하기
connect_str = '***************************************************'             # 연결 문자열 ✅
blob_service_client = BlobServiceClient.from_connection_string(connect_str) # 연결 문자열을 이용해서 Blob Service에 연결- 원격으로 Blob Storage에 컨테이너를 생성한다.
container_name = 'test33container'

container_client = blob_service_client.create_container(container_name)- Local Storage에서 파일을 생성한다.
# Create a local directory to hold blob data
local_path = './data'
os.mkdir(local_path)

# Create a file in the local directory
local_file_name = 'welcome' + '.txt'
upload_file_path = os.path.join(local_path, local_file_name)

# Write text to the file
file = open(upload_file_path, mode='w')
file.write('Welcome to Python')
file.close() # Close를 안하면 파일이 나중에 잘 깨진다. (0B 파일들)- Blob Storage에 Local Storage에서 만든 파일을 업로드한다.
blob_client = blob_service_client.get_blob_client(container=container_name, blob=local_file_name)
with open(file=upload_file_path, mode='rb') as data:    # rb : read binary
blob_client.upload_blob(data)- Blob Storage에 있는 파일들의 목록을 확인한다.
# blob 파일의 리스트를 확인한다.
print('\\nListing blobs')

blob_list = container_client.list_blobs()
for blob in blob_list:
print('\\t' + blob.name)- Blob Storage에 있는 파일을 Local Storage로 다운로드 받는다. 그리고 다운로드 받은 파일의 경로를 출력한다.
- 이때, 파일의 이름을 DOWNLOAD.txt 로 변경한다.
# Download the blob to a local file
# Add 'DOWNLOAD' befere the .txt extendsion so you can see both files in the data directory

download_file_path = os.path.join(local_path, str.replace(local_file_name,'.txt','_DOWNLOAD.txt'))
print(download_file_path)
container_client = blob_service_client.get_container_client(container=container_name)

with open(file=download_file_path, mode='wb') as download_file:
download_file.write(container_client.download_blob(blob.name).readall())- 지금까지 생성하고 생성된 파일들과 디렉터리를 지운다.
② File Service 다루기
- 실습을 위해 필요한 패키지를 설치한다.
!pip install azure-storage-file- Azure Storage Account의 이름(account_name)과 액세스 키(account_key)를 불러와 File Share와 연결을 시켜준다.
from azure.storage.file import FileService
file_service = FileService(account_name='mylabuserstorage', account_key='*******************************************') # 액세스 키 ✅- File Storage에 새로운 폴더(myshare)를 하나 만든다.
file_service.create_share('myshare')- File Storage에 새로운 디렉터리를 생성한다. (myshare 폴더에 sampledir 폴더를 만든다.)
file_service.create_directory('myshare', 'sampledir')- Local Storage의 이미지 파일(iu.jfif)을 myfile.jfif로 이름을 바꾸어 File Storage의 sampledir 폴더에 업로드한다.
from azure.storage.file import ContentSettings
file_service.create_file_from_path(
    'myshare',
    'sampledir',
    'myfile.jfif',
    'iu.jfif'
)- File Storage의 myshare 디렉터리 내부 파일들의 목록을 출력한다.
# Directory 내용의 확인
generator = file_service.list_directories_and_files('myshare')
for file_or_dir in generator:
  print(file_or_dir.name)
- File Storage의 파일을 Local Storage로 다운로드한다.
- 다운로드를 하고 파일의 이름을 IU_DOWNLOAD.jfif로 바꾼다.
# 파일을 가져오는 코드
file_service.get_file_to_path('myshare', 'sampledir', 'myfile.jfif', 'IU_DOWNLOAD.jfif')- 스냅샷을 만들어보고 확인해 본다.
# Snapshot
metadata = { 'foo' : 'bar' }
snapshot = file_service.snapshot_share('myshare', metadata=metadata)
# 확인
share = list(file_service.list_shares(include_snapshots=True))
directories_and_files = list(file_service.list_directories_and_files('myshare', snapshot='2023-05-14T12:09:25.0000000Z')) # 지정된 스냅샷으로 돌아갈 수 있다.
for file_or_dir in directories_and_files:
print(file_or_dir.name)
- 스냅샷을 삭제해본다.
# 스냅샷 삭제
file_service.delete_share('myshare', snapshot='2023-05-14T12:09:25.0000000Z') # 특정 스냅샷만 삭제- 지금까지 생성했던 파일을 삭제해본다. (myshare/sampledir/myfile.jfif)
file_service.delete_file('myshare', 'sampledir', 'myfile.jfif')- 생성했던 공유 폴더 자체를 삭제한다.
- 공유 폴더에 스냅샷이 들어있으면 삭제가 되지 않으니, 반드시 공유 폴더 안에 있는 스냅샷을 모두 지워준 후 이 작업을 수행한다.
③ Queue Service 다루기
- 실습을 위해 필요한 패키지를 설치한다.
!pip install azure-storage-queue==2.1.0
from azure.storage.queue import QueueService, QueueMessageFormat- 연결 문자열을 이용하여 연결한 후, queue-myqueue라는 이름의 큐를 Azure Storage Account에 생성한다.
connect_str='************************************************************' # 연결 문자열 ✅

queue_name = 'queue-myqueue'
queue_service = QueueService(connection_string=connect_str)

queue_service.create_queue(queue_name)- 큐에 메시지를 저장해본다.
- 메시지로 변환하는 것을 엔코드(Encode) 라고 한다. (Encoding)
- 메시지를 풀어내는 것을 디코드(Decode) 라고 한다. (Decoding)
queue_service.encode_function = QueueMessageFormat.binary_base64encode    # Encoding (메시지로 집어 넣는 것)
queue_service.decode_function = QueueMessageFormat.binary_base64decode    # Decoding (메시지를 풀어 내는 것)
import base64
message = 'Hello World2'
print('Adding message: ' + message)

message = base64.b64encode(message.encode('utf-8'))     # 안에 있는 내용들을 base64 방식으로 인코딩한다. (유니코드)
queue_service.put_message(queue_name, message) # 큐에 메시지를 집어 넣는다.- Azure Queue 페이지에서 암호화된 메시지를 확인할 수 있다.
- 이제 이 암호화된(인코딩된) 메시지를 선택해서 가져온 후, 출력해본다.
messages = queue_service.peek_messages(queue_name) # 메시지를 선택해서 가져오기 : Peak 방식

for peeked_message in messages:
message = base64.b64decode(peeked_message.content)    # 메시지를 base64 방식으로 디코딩한다.
print('Peeked message: ' + message.decode('utf-8'))- Peak이 아닌 Get 방식으로 Azure Queue 페이지의 메시지를 가져와 본다.
- Peak 방식은 확인만 하는 것이다. 즉, 메시지를 가져오지 않는다. (간보기)
- Get 방식은 실제로 가져오는 것이다.
messages = queue_service.get_messages(queue_name) # 메시지를 선택해서 가져오기 : Get 방식

for msg in messages:
message = base64.b64decode(msg.content)            # 메시지를 base64 방식으로 디코딩한다.
print('Got message: ' + message.decode('utf-8'))- Azure 서버에 생성한 큐를 삭제한다.
참고 사이트
Storage 계정 개요 - Azure Storage
Azure Storage의 다양한 스토리지 계정 유형에 대해 알아봅니다. 계정 이름, 성능 계층, 액세스 계층, 중복, 암호화, 엔드포인트 등을 살펴봅니다.
learn.microsoft.com
728x90
728x90
'Cloud > Azure' 카테고리의 다른 글
| [Azure] 가상 네트워크(Virtual Network) 생성 후, 네트워크 보안 그룹(NSG)을 통한 네트워크 트래픽 필터링 (NIC 연결) (1) | 2023.05.19 |
|---|---|
| [Azure] 가상 네트워크(Virtual Network) 배포 및 실습 (1) | 2023.05.19 |
| [Azure] 비주얼 스튜디오 코드(VS Code)와 애저(Azure) 연동하기 (0) | 2023.05.19 |
| [Azure] 애저(Azure) 테넌트(Tenant) ID 찾는 방법 (0) | 2023.05.18 |
| [Azure] Microsoft Azure 공부 내용 정리 📝 (0) | 2023.05.09 |
| [Azure] 윈도우(Windows) VM 배포/연결 (0) | 2023.05.09 |
| [Azure] 리눅스 VM 배포/연결 및 실습 (0) | 2023.05.08 |
| [Azure] GPT(Generative Pre-trained Transformer) (0) | 2023.05.05 |